Sugar-Free Cocoa and Almond Truffles
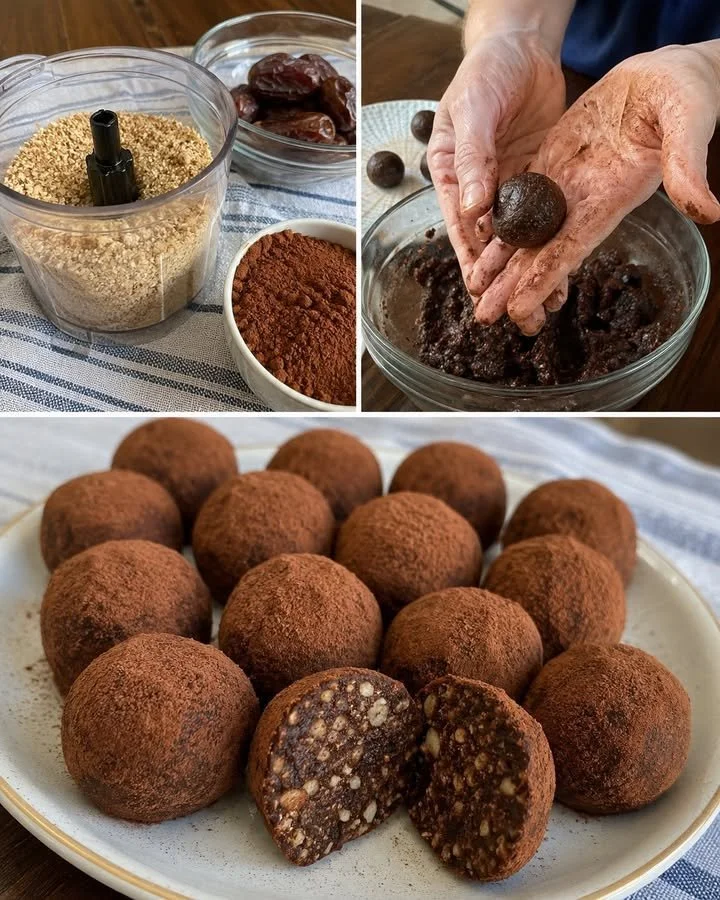
Sometimes you want a little sweet treat that’s simple, wholesome, and doesn’t load up on sugar. These no-sugar almond cocoa truffles come together with just a handful of ingredients, making them a perfect snack or dessert whenever you crave something indulgent but clean. The combination of finely crushed almonds and pure cocoa gives them a satisfying texture and rich flavor without anything artificial. Adding a splash of plant-based milk or water helps bind everything together into a soft, pliable dough that’s easy to roll into bite-sized truffles.
One thing that makes these truffles so handy is how customizable they are—you can adjust the amount of liquid to get just the right consistency, and they hold up beautifully after chilling. I found that letting them rest in the fridge for at least an hour really helps them firm up and makes serving easier. Plus, they keep well, so you can make a batch ahead and enjoy a guilt-free treat throughout the week.
Why You’ll Love This Recipe
- Made with just three simple, natural ingredients you probably already have.
- No added sugar but rich in flavor thanks to pure cocoa and almonds.
- Quick to prepare with minimal kitchen tools.
- Easy to customize texture by adjusting liquid amount.
- Perfect for a healthy snack, dessert, or on-the-go treat.
- Chilling time helps the truffles firm up for a perfect bite every time.
Ingredients
- 7 oz (200 g) raw almonds
- 2 tablespoons (15 g) unsweetened cocoa powder
- 2 to 3 tablespoons (30-45 ml) water or plant-based milk (such as almond, oat, or soy milk)
Ingredient Notes
Almonds provide a creamy, slightly crunchy base, offering healthy fats and natural sweetness. Use raw or dry-roasted almonds for more flavor; avoid salted varieties to keep the recipe balanced. Unsweetened cocoa powder imparts deep chocolate flavor without bitterness or unnecessary sugars. For the liquid, water works fine to keep things simple, but plant-based milk adds just a touch of extra creaminess and richness. Choose your favorite based on dietary preferences or what you have on hand.
Kitchen Tools Needed
- Food processor or mortar and pestle (for grinding almonds)
- Mixing bowl
- Measuring spoons and cups
- Hands for shaping the truffles
- Airtight container for storage
Step-by-Step Instructions
- Grind the almonds: Place the almonds in a food processor and pulse until they turn into a coarse, sandy texture. Be careful not to over-process, or you’ll end up with almond butter. If you don’t have a food processor, use a mortar and pestle, crushing in small batches for best results.
- Mix in cocoa powder: Add the unsweetened cocoa powder to the ground almonds and stir thoroughly to combine. This helps distribute the chocolate flavor evenly throughout the mixture.
- Add liquid gradually: Pour in 2 tablespoons (30 ml) of water or plant-based milk and start mixing. If the mixture feels too dry and crumbly, add more liquid tablespoon by tablespoon until a soft, pliable dough forms. It should be moist enough to stick together but not sticky or wet.
- Form truffles: Wash your hands and roll small portions of the dough into bite-sized balls, about 1 inch (2.5 cm) in diameter. Try to make them uniform so they chill evenly.
- Chill to set: Arrange the truffles in a single layer in an airtight container and refrigerate for at least 1 hour. This helps them firm up and develop a better texture.
- Serve and enjoy: Keep the truffles stored in the fridge and serve chilled for a refreshing, wholesome treat anytime.
Pro Tips
- Toast the almonds lightly before grinding for extra depth of flavor—just a few minutes in a dry skillet on medium heat until fragrant.
- Use a silicone spatula or spoon for mixing to prevent sticking and get everything combined more efficiently.
- If you want smoother truffles, pulse longer in the food processor but watch carefully to avoid turning it into butter.
- Try rolling the finished truffles in extra cocoa powder, finely chopped nuts, or unsweetened shredded coconut for extra texture and visual appeal.
- Adding a pinch of salt to the mix can balance the cocoa’s bitterness and elevate the overall flavor.
- Always store the truffles in the fridge; the cool temperature keeps their texture firm and fresh longer.
Common Mistakes
- Over-processing the almonds, which can cause the mixture to become oily and difficult to shape.
- Adding too much liquid at once, making the dough overly sticky and hard to roll. Add liquids gradually for better control.
- Skipping the chilling step, which leads to crumbly truffles that fall apart easily.
- Using roasted or salted almonds without adjusting the recipe, which can alter the flavor balance.
- Trying to shape the truffles with dry hands, causing the mixture to stick—wet or lightly moistened hands work best.
Variations
- Add a teaspoon of vanilla extract or almond extract for a subtle flavor boost.
- Mix in finely chopped dried fruits like cranberries or raisins for fruity bites.
- Stir in a tablespoon of nut butter (almond or peanut) for a creamier texture and richer taste.
- Roll the finished truffles in crushed freeze-dried raspberries or matcha powder for a colorful twist.
Serving Suggestions
These truffles work beautifully as a healthy dessert option alongside fresh fruit or a dollop of plant-based yogurt. They’re also great for packing in a lunchbox, serving with afternoon tea or coffee, or as an after-dinner nibble when you want a light chocolate fix. Their small size and no-mess nature make them ideal for gatherings or gift boxes.
Storage Instructions
Keep the truffles in an airtight container in the refrigerator. They will stay fresh for about 1 week. If you want them to last longer, you can freeze them for up to 3 months—just thaw in the fridge before serving.
Reheating Tips
These truffles are best enjoyed cold or at room temperature. Because they don’t contain any binders that melt cleanly, reheating isn’t recommended—the texture could become grainy or overly soft.
Nutrition Estimate (per truffle, makes about 15)
- Calories: 70
- Protein: 2 g
- Carbohydrates: 3 g
- Fat: 6 g
Recipe Summary
- Prep Time: 10 minutes
- Chill Time: 1 hour
- Total Time: 1 hour 10 minutes
- Servings: About 15 truffles
- Cuisine: Healthy Snacks
- Course: Dessert or Snack
- Calories per serving: 70
Frequently Asked Questions
Can I use other nuts instead of almonds?
Yes, you can substitute walnuts, cashews, or hazelnuts, but keep in mind that oils and texture will vary, so adjust liquid amounts accordingly.
Do I have to use a food processor?
No, a mortar and pestle works fine though it’s more labor-intensive. A small blender might work but be careful not to over-process.
Is it necessary to use unsweetened cocoa powder?
Using unsweetened cocoa powder keeps the recipe sugar-free. Sweetened cocoa will add sugar and change the flavor profile.
Can I add sweeteners if I want?
If you prefer your truffles sweeter, add a teaspoon of maple syrup or honey—but this will no longer be sugar-free as originally intended.
How do I know if the dough has the right consistency?
It should hold together easily without crumbling, feel moist but not sticky, and roll smoothly into balls without falling apart.
These almond cocoa truffles prove you don’t need sugar or complicated ingredients to create a satisfying, chocolatey treat. Whether you’re keeping snacks clean for health reasons or just want a quick something nice with minimal fuss, these bite-sized delights check all the boxes. Keep a batch on hand—you’ll be reaching for more than one.