Cheese Pastries
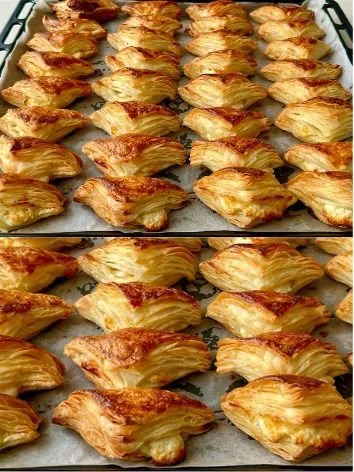
Cheese Pastries are a delightful treat that brings comfort and joy with every bite. The flaky crust filled with tangy cheese makes them an irresistible snack or appetizer. These pastries are popular in many cultures, often enjoyed during gatherings, holidays, or simply as a delightful snack at home. The beautiful golden color, combined with the aroma of baking butter and cheese, creates a mouthwatering experience that’s hard to resist. Whether you’re hosting friends or just treating yourself, these pastries will surely impress.
Gather Your Cheese Pastries Ingredients
To whip up a batch of these delicious pastries, you’ll need a few simple ingredients. Here’s what you’ll need:
- 550 g (5 cups) all-purpose flour
- 400 ml (2 cups) water
- 8 g (1 teaspoon) salt
- 100 g (1 cup) wheat starch or cornstarch for dusting
- 200 g (14 tablespoons) butter, melted
- 200 g (7 oz) white cheese (feta or similar), crumbled
- 1 egg yolk, beaten
Step-by-Step Cheese Pastries Recipe
Let’s dive into the process of making these delightful pastries! Follow these steps to create the perfect cheese-filled treats:
-
Mix the Dough: In a large bowl, place the flour and create a well in the center. Add the salt and water. Using a spatula, mix until everything is combined. Then, knead by hand until you have a smooth, soft dough that doesn’t stick to your hands.
-
Divide the Dough: Transfer the dough to a work surface and divide it into 4 equal portions. Roll each piece into a ball.
-
Roll Out the Dough Balls: Take each dough ball and roll it out to about 20 cm (8 inches) in diameter.
-
Stack the Dough Circles: Stack all 4 rolled-out dough circles on top of each other, generously dusting wheat starch between each layer to prevent sticking.
-
Roll Out the Stack: Roll out the stacked dough to a diameter of 40-45 cm (16-18 inches).
-
Separate and Stack Again: Carefully separate the 4 thin sheets and stack them again, brushing melted butter generously between each layer.
-
Stretch the Dough: Gently pull the edges of the dough to stretch it slightly larger. Fold the buttered stack as shown in the original method, brushing more butter between each fold.
-
Chill the Dough: Place the folded dough on a tray and freeze for about 20 minutes to firm up the butter layers.
-
Shape the Dough: Once firm, remove the dough from the freezer and roll it into a square shape, approximately 30×30 cm (12×12 inches).
-
Cut and Fill: Cut the dough into 36 equal squares. Place a small amount of crumbled cheese in the center of each square.
-
Fold and Seal: Fold each square diagonally to create triangles, pressing the edges to seal them tight.
-
Prepare for Baking: Arrange the triangles on a parchment-lined baking sheet and brush the tops with beaten egg yolk.
-
Bake: Preheat your oven to 180°C (355°F) on the fan setting. Bake for 20-25 minutes or until the pastries are golden brown and crispy.
How to Serve Cheese Pastries
These delightful pastries are incredibly versatile! You can serve them warm straight from the oven, allowing the cheesy goodness to melt in your mouth. They pair wonderfully with a fresh salad or a bowl of yogurt for a contrasting flavor. For a special treat, try serving them with a dipping sauce like tzatziki or a spicy salsa.
Expert Tips for Cheese Pastries
- Use Your Favorite Cheese: Feel free to experiment with different kinds of white cheese if you’re looking for a unique flavor. Goat cheese or a mix of cheeses can add a delicious twist!
- Saturday Snack: These pastries are perfect for making ahead of time. Freeze them before baking and pop them in the oven straight from the freezer when your cravings hit.
- Add Some Herbs: For extra flavor, consider adding fresh herbs like dill or parsley to the cheese filling.
Cheese Pastries FAQs
Q: Can I use a different type of flour?
A: Absolutely! If you prefer, you can use whole wheat flour or gluten-free flour. However, the texture might vary slightly.
Q: How do I store leftover pastries?
A: Store them in an airtight container in the fridge for up to three days. Reheat them in the oven to maintain their flaky texture.
Q: Can I make the filling ahead of time?
A: Yes! You can prepare the cheese filling and store it in the refrigerator for up to a day before using it.
Give these cheese pastries a try, and enjoy the delightful flavors they bring to your table. Happy baking!

Cheese Pastries
Ingredients
Method
- In a large bowl, place the flour and create a well in the center. Add the salt and water. Mix until combined, then knead the dough by hand until smooth and soft.
- Transfer the dough to a work surface and divide it into 4 equal portions. Roll each portion into a ball.
- Roll each dough ball into a circle approximately 20 cm (8 inches) in diameter.
- Stack the rolled circles on top of each other, dusting with wheat starch between each layer.
- Roll the stacked dough into a larger circle, about 40-45 cm (16-18 inches) in diameter.
- Carefully separate the dough sheets and stack them again, brushing melted butter between each layer.
- Gently stretch the edges of the dough and fold it, using more butter between each fold.
- Chill the folded dough in the freezer for about 20 minutes.
- Once firm, roll the dough into a square shape, approximately 30×30 cm (12×12 inches).
- Cut the dough into 36 equal squares.
- Place a small amount of crumbled cheese in the center of each square.
- Fold each square diagonally to create triangles, sealing the edges tightly.
- Arrange the triangles on a parchment-lined baking sheet and brush the tops with beaten egg yolk.
- Preheat the oven to 180°C (355°F) using the fan setting.
- Bake for 20-25 minutes or until the pastries are golden brown and crispy.