Homemade Cheese Spread with Milk and Herbs
Have you ever wanted a fresh, homemade cheese spread that tastes simply delightful but feels fancy enough to serve at a gathering? This milk and herb cheese spread strikes a perfect balance between easy to make and wonderfully flavorful. Using just a few basic ingredients you might already have on hand, it transforms whole milk into a smooth, creamy cheese packed with fresh herbs and a touch of olive oil. It’s a lovely way to add a homemade touch to your breakfasts, snacks, or sandwiches.
The gentle curdling with lemon juice creates a soft cheese that’s begging to be paired with crusty bread or crisp veggies. I like making it when I need something fresh and natural, especially because it keeps well for a few days in the fridge and can be adapted with different herbs depending on the season or your preferences. Just a little patience in draining the curds gives it the perfect spreadable texture without any fancy equipment.
Why You’ll Love This Recipe
- Made from simple ingredients you likely already have in your kitchen
- Smooth, creamy texture that spreads easily on bread or crackers
- Fresh herbs add a bright, natural flavor without overpowering
- Naturally gluten-free and customizable to your taste
- Requires minimal hands-on time with easy steps to follow
- Gently warming the milk prevents scorching and ensures smooth curds
Ingredients
- 4 cups (960 ml) whole milk
- 3 tablespoons (45 ml) fresh lemon juice
- ½ teaspoon (3 g) salt
- 1 tablespoon (15 ml) chopped fresh dill or parsley
- 1 tablespoon (15 ml) extra-virgin olive oil
- Black pepper, to taste
Ingredient Notes
Whole milk is key here for a rich, creamy spread—avoid skim or low-fat milk as they won’t form curds properly. Fresh lemon juice helps gently separate the curds without bitterness; bottled lemon juice can work but fresh yields the best flavor. Feel free to switch up the herbs: dill brings a subtle anise note, while parsley offers a fresh, slightly grassy taste. Olive oil adds silkiness and a touch of fruitiness—don’t skip it or substitute with a neutral oil for best results. Salt balances the flavors, and black pepper adds just a subtle kick.
Kitchen Tools Needed
- Medium saucepan
- Wooden spoon or heat-safe spatula
- Fine-mesh strainer or sieve
- Cheesecloth or a clean kitchen towel
- Medium mixing bowl
- Airtight container for storage
Step-by-Step Instructions
-
Pour the whole milk into a medium saucepan and place over medium heat. Warm the milk gently, stirring occasionally, until it just begins to simmer around the edges—this usually takes about 8 to 10 minutes. Avoid letting it boil, as too much heat can toughen the curds.
-
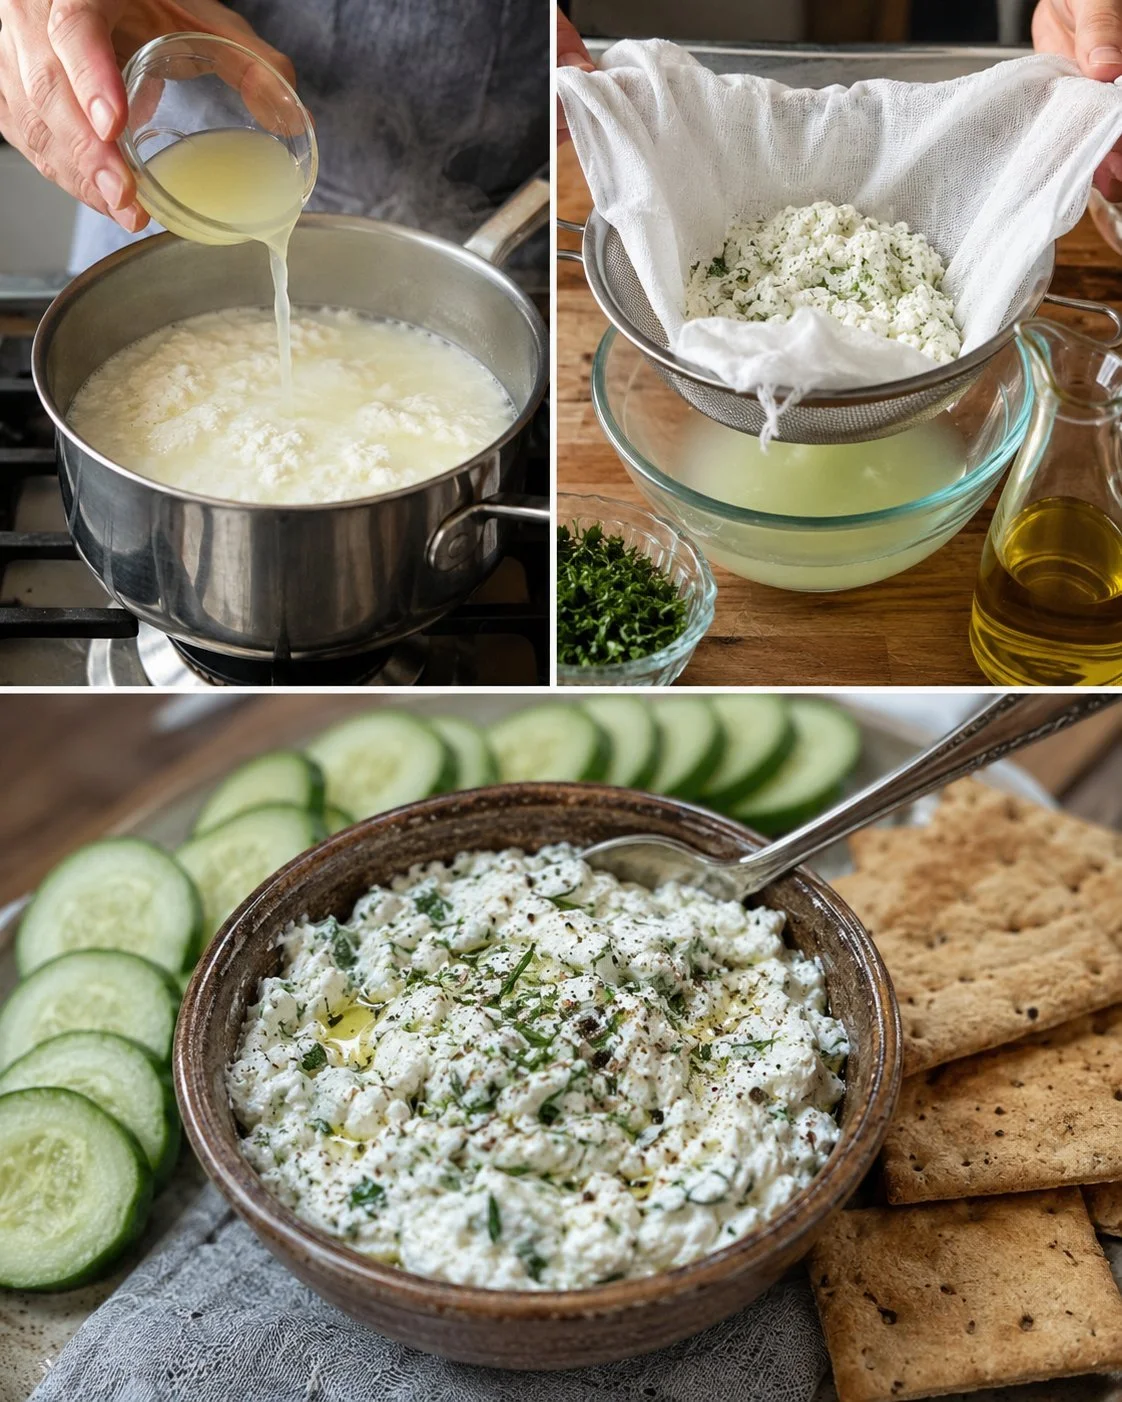
Remove the saucepan from heat. Slowly stir in the fresh lemon juice, combining it evenly throughout the milk. Return the pan to very low heat and stir gently for 1 to 2 minutes. You’ll see the curds start to separate from the whey—a sign that the milk has properly curdled.
-
Line a fine-mesh strainer with cheesecloth and set it over a bowl to catch the draining whey. Carefully pour the curds and whey into the strainer. Let it drain for about 20 minutes. Avoid pressing or squeezing the cheesecloth, as this can make the spread too dry or crumbly.
-
Transfer the drained curds to a mixing bowl. Add salt, chopped herbs, olive oil, and black pepper to taste. Stir gently to combine, making sure everything is evenly distributed without breaking the curds down too much.
-
Taste and adjust the seasoning as needed—adding a pinch more salt or black pepper can really lift the flavors. Transfer the cheese spread to an airtight container and chill for at least 1 hour to allow it to firm up and the flavors to meld before serving.
Pro Tips
- Use a thermometer if you’re unsure, aiming for about 180°F (82°C) when warming the milk—just before simmering.
- Stir gently throughout to avoid breaking curds too much, which affects texture.
- Let the cheese drain on the counter but avoid letting it sit too long, or it might dry out. Twenty minutes is usually perfect.
- For an even smoother spread, pulse the cooled curds briefly in a food processor, but this isn’t necessary.
- Fresh herbs are preferable, but dried herbs can work (use about one-third the quantity), added after chilling.
Common Mistakes
- Letting the milk boil or get too hot can yield tough curds that don’t spread well.
- Pouring the lemon juice too quickly can shock the milk and cause uneven curdling. Stir gently and add slowly.
- Skipping the draining step results in a watery, loose cheese rather than a creamy spread.
- Over-pressing or squeezing the curds makes the spread crumbly and dry instead of smooth and creamy.
- Forgetting to chill the cheese before serving loses the chance to develop full flavor and texture.
Variations
- Swap fresh dill or parsley for chives, basil, or tarragon for different herbal notes.
- Add a garlic clove minced finely or garlic powder for a savory twist.
- Stir in a teaspoon of honey or a pinch of smoked paprika to gently sweeten or add smokiness.
- Mix in finely chopped sun-dried tomatoes or olives for a Mediterranean flair.
Serving Suggestions
This cheese spread is perfect on fresh baguette slices, toasted sourdough, or crackers. It pairs beautifully with fresh cucumber, radishes, or carrot sticks as a snack. Use it as a flavorful base for open-faced sandwiches topped with smoked salmon, sliced tomatoes, or roasted vegetables. You can also dollop it on warm grilled chicken or fish for a fresh, creamy finish.
Storage Instructions
Store the cheese spread in an airtight container in the refrigerator. It will keep well for up to 3 days. Make sure to give it a good stir before serving, as some separation may occur.
Reheating Tips
This cheese spread is best served chilled or at room temperature. Reheating isn’t recommended since it can cause separation and alter the texture.
Nutrition Estimate (per ¼ cup / 60 g serving)
- Calories: 120
- Protein: 6 g
- Carbohydrates: 3 g
- Fat: 9 g
Recipe Summary
- Prep Time: 5 minutes
- Cook Time: 10 minutes
- Draining Time: 20 minutes
- Chilling Time: 1 hour
- Total Time: About 1 hour 35 minutes
- Servings: 6
- Cuisine: Homemade / Fresh Cheese
- Course: Spread / Snack
- Calories: 120 per serving
Frequently Asked Questions
Can I use low-fat or skim milk instead of whole milk?
Whole milk provides the best texture and richness. Skim or low-fat milk won’t form curds properly and will result in a watery spread.
What if I don’t have fresh lemon juice?
While fresh lemon juice is ideal for flavor and effectiveness, bottled lemon juice can work in a pinch. Avoid lemon-flavored or sweetened juices.
Can I skip the herbs or use dried instead of fresh?
Yes, herbs are flexible here—though fresh gives the best brightness. If using dried, reduce the amount to about a third and add after chilling.
How do I know when the curds and whey have separated?
You’ll see the milk solids clump together and the liquid whey look clear and slightly yellowish—similar to buttermilk.
Can I double this recipe?
Absolutely! Just keep the same proportions and use a larger pot. Drain longer if the curds seem too wet.
This homemade milk and herb cheese spread is a great example of how simple ingredients can turn into something fresh and special. It takes a bit of care with warming the milk and draining the curds, but the result is a creamy, flavorful spread you can customize easily. Whether for everyday breakfasts or a small gathering, it’s a satisfying way to bring homemade goodness to your table.