Best Greek Yogurt at Home: Easy Recipe
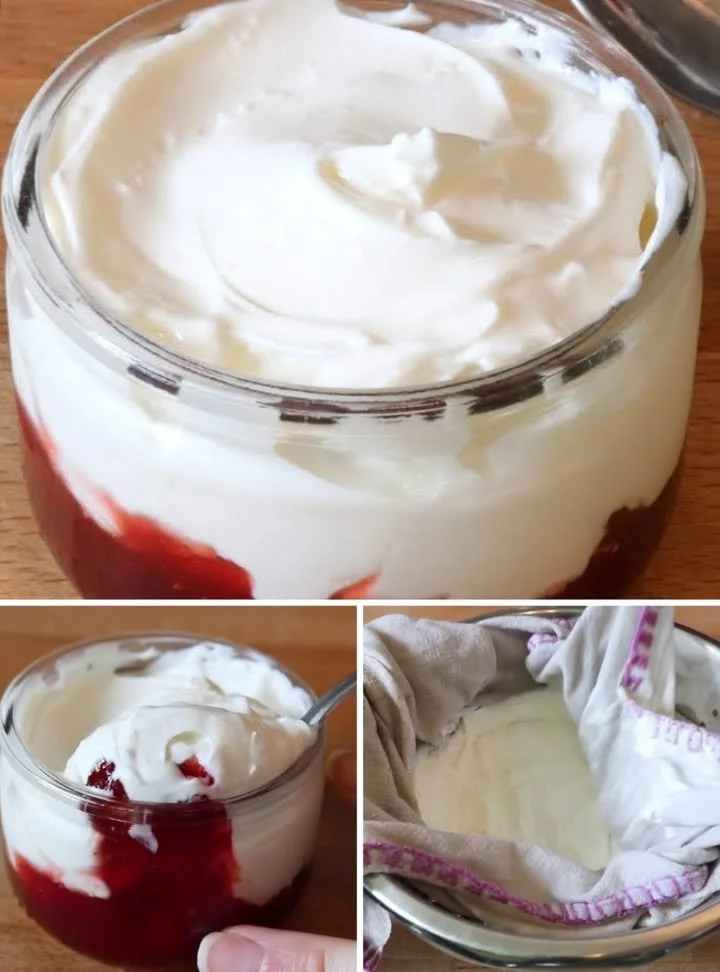
Making Greek yogurt at home is not only rewarding but also incredibly simple. With just a few ingredients, you can whip up creamy, tangy, and luscious yogurt that far surpasses anything you can buy at the store. The best part? You control the flavor and texture, making it perfect for your taste preferences. After a little experimenting, I’ve found a method that consistently works well, and I can confidently share tips to ensure you get it right. This homemade Greek yogurt is delicious on its own or can be used in a variety of recipes, from dips to smoothies.
Why You’ll Love This Recipe
- Quick to Prepare: With minimal active time, you can set it and forget it.
- Cost-Effective: Homemade yogurt is often cheaper than store-bought.
- Healthy: Packed with probiotics, it’s great for digestion.
- Versatile: Use it for breakfasts, desserts, and savory dishes.
- Customizable: Easily adjust thickness and tanginess to your liking.
Ingredients
- 1 quart (946 ml) whole milk
- 3 tablespoons (45 g) plain yogurt with live active cultures
- Optional: 1 tablespoon (15 g) powdered milk (for thicker yogurt)
Ingredient Notes
Using whole milk gives a creamier yogurt, while the powdered milk helps enhance texture. Ensure your yogurt starter contains live cultures for successful fermentation.
Kitchen Tools Needed
- Heavy-bottomed saucepan
- Whisk or spoon
- Thermometer (optional but helpful)
- Clean kitchen towel or cheesecloth
- Large bowl
- Strainer or fine mesh sieve
Step-by-Step Instructions
-
Heat the Milk: Pour the whole milk into a heavy-bottomed saucepan and heat over medium until it reaches 180°F (82°C), stirring occasionally to prevent scorching. This helps denature the proteins, resulting in a creamier texture.
-
Cool the Milk: Remove from heat and let it cool to around 110°F (43°C). Use a thermometer for accuracy; if you don’t have one, the milk should feel warm but not hot to the touch.
-
Add the Yogurt Starter: In a small bowl, mix the plain yogurt with a few tablespoons of the cooled milk until smooth. This helps to incorporate the cultures. Then, whisk it back into the pot of warm milk.
-
Ferment: Pour the mixture into a clean bowl and cover with a kitchen towel. Keep it in a warm, draft-free area for 6 to 12 hours. A longer fermentation will yield tangier yogurt.
-
Strain the Yogurt (optional): For Greek yogurt, place the strainer over another bowl and line it with your cheesecloth. Pour the yogurt into the strainer and let it drain for 1 to 2 hours, depending on how thick you want it.
-
Store: Transfer the thickened yogurt into a clean container with a lid and refrigerate. Homemade yogurt can last up to 2 weeks.
Pro Tips
- Temperature Matters: Keeping a consistent warmth during fermentation is crucial; a turned-off oven with the light on can be a great spot.
- Tweak the Thickness: Drain it longer for thicker yogurt or less for a creamier consistency.
- Use a Sample: Maintaining a little of your homemade yogurt to use as a starter for the next batch keeps the process easy.
Common Mistakes
- Too Hot or Too Cold: If the milk is too hot when adding the yogurt starter, it will kill the cultures. Conversely, if it’s too cold, they won’t activate properly.
- Not Covering Properly: Leaving your yogurt exposed can introduce bacteria and affect the flavor.
- Rushing Fermentation: Don’t check on the yogurt too soon; it needs time to develop the right tang and texture.
Variations
- Flavored Yogurt: Mix in honey, vanilla extract, or fresh fruits after it has set.
- Greek-Style: Adjust the straining time for the desired thickness.
- Skim Milk Version: Use skim or low-fat milk for a lighter version, though the texture may be less creamy.
- Dairy-Free: Substitute with coconut milk or almond milk, but ensure you add a thickener like gelatin.
Serving Suggestions
Serve your Greek yogurt with honey and nuts for breakfast, as a dip for veggies, or dolloped on top of soups. It’s a fantastic addition to smoothies, parfaits, or even savory dishes like tzatziki.
Storage Instructions
Store your homemade yogurt in an airtight container in the refrigerator for up to 2 weeks. If it separates, simply stir it back together.
Reheating Tips
There’s no need to reheat yogurt once it’s made, but if you’re adding it to hot dishes, stir it in gently to avoid curdling.
Nutrition Estimate
Calories: 140
Protein: 8 g
Carbohydrates: 10 g
Fat: 8 g per serving (1/2 cup)
Recipe Summary
Prep Time: 15 minutes
Cook Time: 2 hours (includes cooling and straining)
Total Time: 8 to 12 hours (fermentation)
Servings: about 4 cups
Cuisine: Mediterranean
Course: Snack/Dessert
Calories: 140
Frequently Asked Questions
Can I use low-fat milk instead of whole milk?
Yes, but the yogurt may be less creamy.
How do I know when my yogurt is ready?
It should be set and have a slightly tangy flavor.
What if my yogurt doesn’t thicken?
Ensure your cultures were active and the fermentation environment was warm enough.
Can I use flavored yogurt for the starter?
Yes, but avoid ones with added sugars or flavorings for best results.
How can I make more yogurt once I have a batch?
Use 2-3 tablespoons of your existing yogurt as a starter for your next batch.
Making Greek yogurt at home is a straightforward process that rewards you with delicious and nutritious results. Enjoy the process of crafting your own yogurt, and relish the satisfaction of knowing exactly what’s in your bowl!