How to Make Fresh Cheese with 3 Ingredients at Home
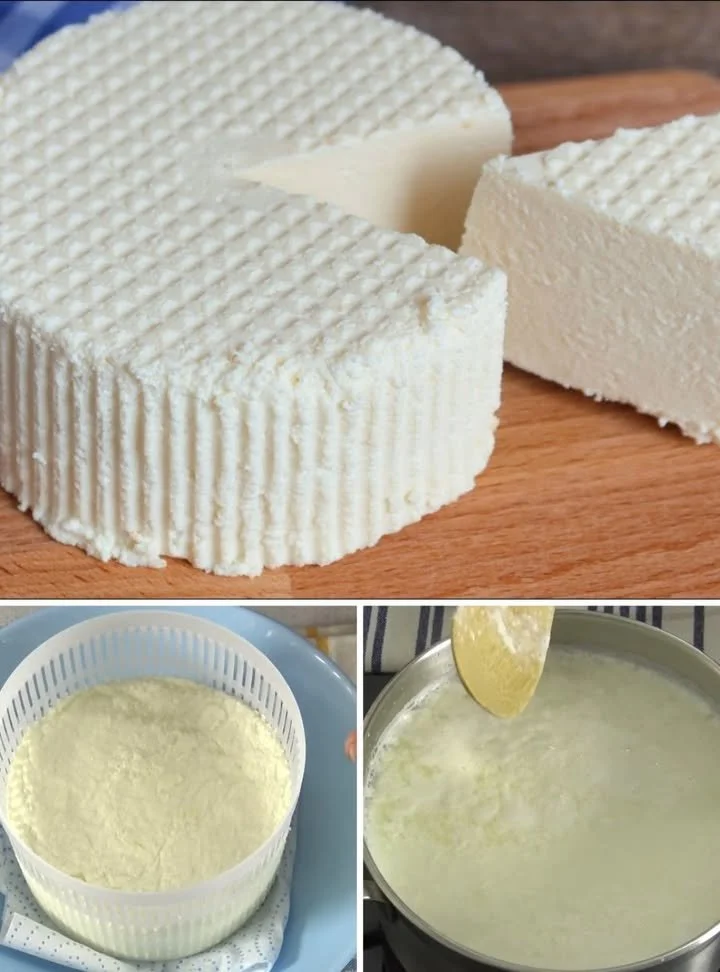
Making fresh cheese is a delightful and surprisingly simple process that anyone can do at home, even if you’re new to cooking. With just three ingredients—milk, vinegar, and salt—you can create a delicious, creamy cheese that can elevate many dishes, or stand beautifully on its own. This fresh cheese is perfect for spreading on bread, tossing into salads, or using as a topping for your favorite pasta. There’s something incredibly satisfying about making cheese from scratch, and you may find that it’s a fun way to impress your family or friends at your next gathering.
Why You’ll Love This Recipe
- Quick and straightforward with only three ingredients.
- No special equipment required; all you need is a pot and a strainer.
- Versatile: use it in both savory and sweet dishes.
- Healthier than store-bought options, with no preservatives or additives.
- Perfect for a beginner cook looking to explore new skills.
Ingredients
- 1 gallon (3.8 L) whole milk (or any milk you have at hand)
- 1/3 cup (80 ml) white vinegar (or lemon juice)
- 1 teaspoon (5 g) salt
Ingredient Notes
- Milk: Whole milk will yield the creaminess you want, but you can use 2% milk if that’s what you have. Skim milk may not work as well since it lacks fat.
- Acid: White vinegar is commonly used, but lemon juice can give a nice, subtle tang.
- Salt: Adjust to taste, but it helps enhance flavor, so don’t skip it.
Kitchen Tools Needed
- Large pot
- Slotted spoon or spatula
- Cheesecloth or a clean kitchen towel
- Strainer or colander
- Bowl for draining
Step-by-Step Instructions
-
Heat the Milk: In a large pot, pour in the whole milk and slowly heat it over medium-low heat. Stir gently to avoid scorching the bottom. Heat until it almost reaches a simmer (about 190°F or 88°C). You’ll notice steam rising and small bubbles forming around the edges.
-
Add the Acid: Once hot, remove the pot from heat. Stir in the vinegar (or lemon juice) and salt. You should see the milk begin to curdle as the solids separate from the whey. Let it sit for about 5-10 minutes to form curds.
-
Strain the Curds: Place a strainer over a bowl and line it with cheesecloth. Carefully pour the curdled mixture into the strainer, letting the whey drain off. If you prefer a drier cheese, let it sit longer, or gently press the curds with the back of a spoon.
-
Season to Taste: After draining, transfer the curds to a bowl. At this point, you can mix in a bit more salt or any herbs and spices you enjoy.
-
Cool and Store: Allow the cheese to cool at room temperature before transferring it to an airtight container and placing it in the refrigerator. It will be best used within a week.
Pro Tips
- Stir the milk slowly to prevent it from sticking to the bottom of the pot when heating.
- Use a thermometer for precision, especially if you’re new to cooking and avoid boiling the milk.
- Press down gently on the cheese in the strainer if you want a firmer texture.
- Experiment with different flavors in the cheese, such as garlic powder or herbs, for a unique twist.
Common Mistakes
- Not heating the milk enough can prevent proper curdling.
- Adding the acid too soon can lead to a grainy texture.
- Forgetting to season: salt really makes a difference in flavor.
- Skipping the cooling step before storing may lead to moisture build-up in the container.
Variations
- Herbed Cheese: Mix in fresh herbs like chives or dill after the initial draining.
- Spicy Cheese: Add red pepper flakes or a splash of hot sauce for a kick.
- Sweet Cheese: Stir in a little honey or maple syrup and some cinnamon for a sweet treat to pair with fruit.
- Labneh Style: Drain the cheese longer for a thicker, creamier texture similar to labneh.
Serving Suggestions
Enjoy this fresh cheese spread on a crusty baguette or as a topping for whole grain crackers. It pairs wonderfully with fruits, honey, or even alongside savory options like olives and roasted veggies.
Storage Instructions
Store any leftover cheese in an airtight container in the refrigerator for up to one week. Make sure to keep it covered to maintain its freshness.
Reheating Tips
Reheating fresh cheese isn’t typically necessary since it’s best enjoyed cold or at room temperature. If desired, you can warm it gently in the microwave for a few seconds, but avoid overheating as it can change the texture.
Nutrition Estimate
Calories: 80 per serving
Protein: 5 g
Carbohydrates: 1 g
Fat: 6 g
Recipe Summary
- Prep Time: 10 minutes
- Cook Time: 15 minutes
- Total Time: 25 minutes
- Servings: About 12 servings
- Cuisine: Various
- Course: Snack/Appetizer
- Calories: 80
Frequently Asked Questions
Can I use low-fat milk?
Yes, but the texture may be drier. Whole milk provides the richest flavor.
Is it necessary to use cheesecloth?
While it’s recommended for strain efficiency, you can use a fine mesh strainer or even a clean kitchen towel if needed.
What can I do with the leftover whey?
Whey is nutritious and can be used in smoothies, bread, or even in soup stocks.
How can I tell if my cheese has gone bad?
If it smells sour or develops an unusual color, it’s best to discard it.
Can I freeze this cheese?
Fresh cheese is best enjoyed fresh, but you can freeze it if necessary. Thaw it slowly in the refrigerator before using it again.
Enjoy making your fresh cheese! It not only simplifies meals but also brings an element of joy to the cooking process.