Easy Christmas No-Bake Desserts for a Festive Table
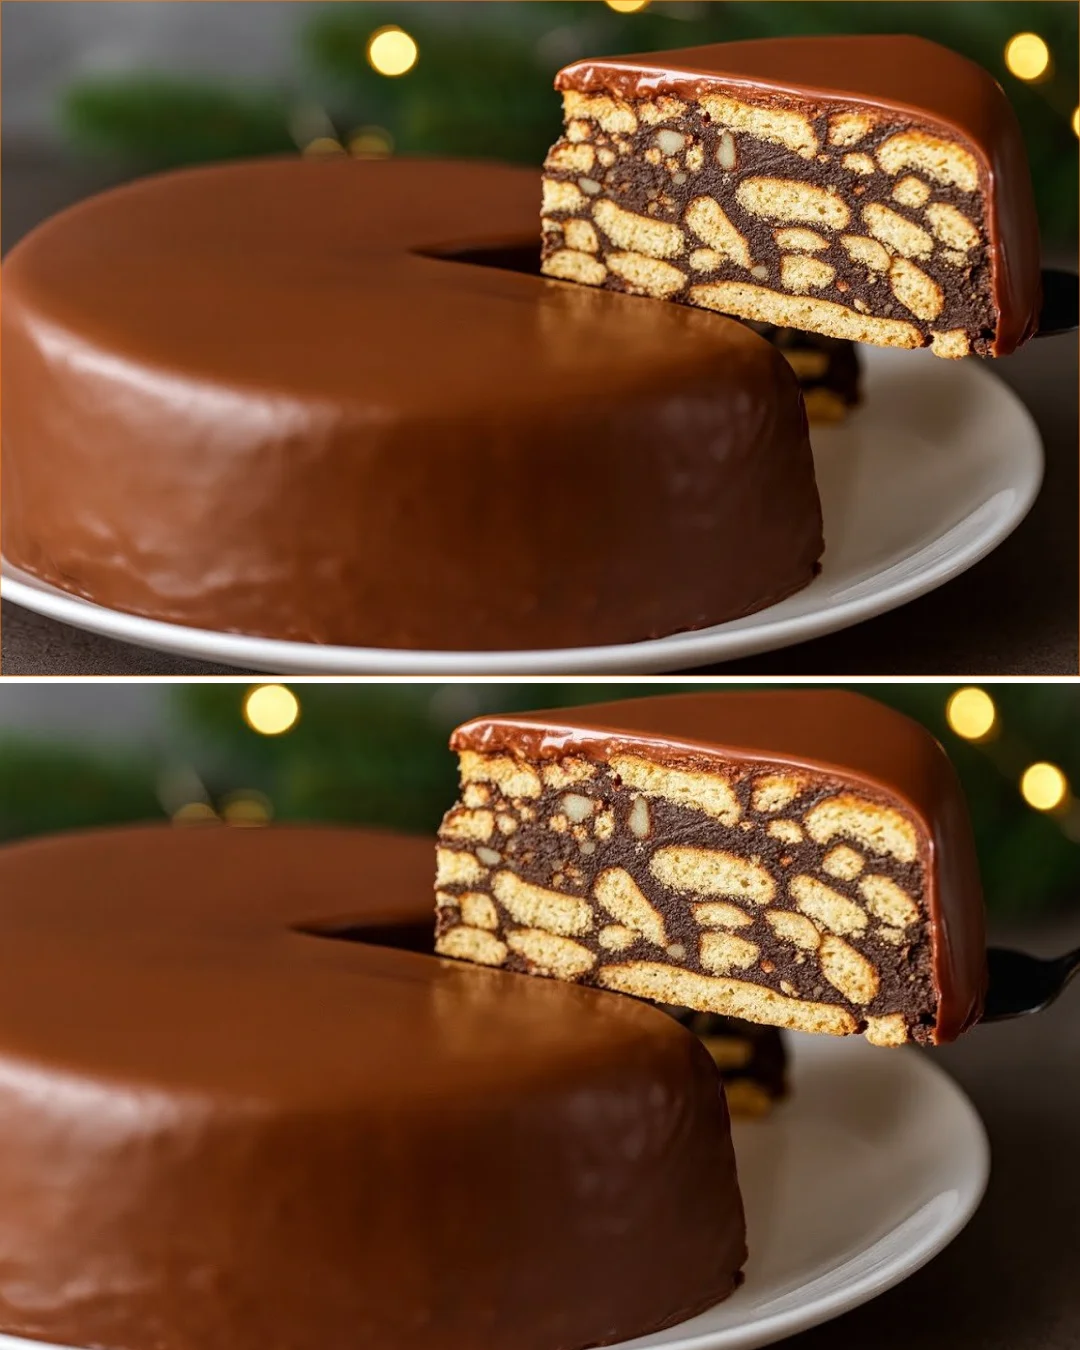
This Christmas no-bake dessert is the kind of recipe that quietly earns its spot on the holiday table. It’s rich, chocolatey, and wonderfully old-fashioned in the best way, with a cookie base that sets up into a sliceable, fudge-like bar after a short chill. I’ve made versions like this for years when I need something festive without turning on the oven, and this one surprised me by how neatly it cuts once the chocolate topping has fully set.
It’s especially useful in December when the kitchen is already busy and oven space is limited. The combination of crushed cookies, walnuts, cocoa, and a smooth chocolate topping feels nostalgic, but the texture is what makes it memorable: dense, slightly chewy, and just firm enough to serve clean slices. On the first test, I learned that giving the base enough time to cool before topping it makes all the difference. That extra chill keeps the chocolate layer glossy and even instead of sinking in.
Why You’ll Love This Recipe
- No oven required, which is a huge win during the holidays.
- The texture is rich and sliceable, almost like a cross between a cookie bar and a fudge slice.
- It uses simple pantry ingredients you may already have.
- The chocolate topping sets beautifully and gives a polished finish.
- It’s easy to make ahead, and the flavor improves after chilling.
- I found it slices much cleaner after resting a little longer than expected, which makes serving easier.
Ingredients
- 17.5 oz cookies, crushed, or about 5 1/2 cups (500 g)
- 3 1/2 oz walnuts, chopped, or about 3/4 cup (100 g)
- 2/3 cup granulated sugar (120 g)
- 2/3 cup unsweetened cocoa powder (60 g)
- 1 cup milk (250 ml)
- 1 teaspoon vanilla sugar or 1 teaspoon vanilla extract mixed with 1 teaspoon sugar
- 10 tablespoons unsalted butter (150 g)
- A pinch of salt
- 2.8 oz dark chocolate, chopped (80 g)
- 2.8 oz milk chocolate, chopped (80 g)
- 2 3/4 tablespoons vegetable oil (40 ml)
Ingredient Notes
The cookies should be plain, dry cookies that crumble easily, such as tea biscuits, digestive-style cookies, or similar. Very buttery cookies can make the base too soft.
Walnuts add flavor and structure. If you chop them too finely, they disappear into the mixture; a rough chop gives the best bite.
Cocoa powder adds the deep chocolate flavor, so use unsweetened cocoa, not drinking chocolate mix.
Milk helps cook the base into a thick, cohesive mixture. I tested this with both whole milk and 2% milk, and whole milk gave a slightly richer result.
The chocolate topping uses both dark and milk chocolate for balance. The oil helps the topping stay smoother and easier to slice once chilled.
Kitchen Tools Needed
- Large saucepan
- Wooden spoon or heatproof spatula
- Mixing bowl
- 8×8-inch or 9×9-inch pan (20×20 cm or 23×23 cm)
- Parchment paper
- Sharp knife
- Measuring cups and spoons
Step-by-Step Instructions
-
Line an 8×8-inch or 9×9-inch square pan with parchment paper, leaving a little overhang for lifting the dessert out later.
-
Crush the cookies into small pieces. You want a mix of crumbs and tiny bits, not a fine powder.
-
Chop the walnuts coarsely so they stay noticeable in the finished dessert.
-
In a large saucepan, combine the crushed cookies, chopped walnuts, granulated sugar, cocoa powder, milk, and vanilla sugar.
-
Cook over medium heat, stirring often, until the mixture starts to bubble and becomes thick and glossy, about 4 to 6 minutes. It should look like a heavy, sticky mass that holds together when stirred.
-
Remove the pan from the heat and stir in the butter and pinch of salt until fully melted and incorporated. The mixture should become smoother and richer.
-
Spread the base evenly into the prepared pan. Press it down gently with a spatula or the back of a spoon so the surface is level, but do not pack it too tightly.
-
Refrigerate the base for about 1 hour, or until firm enough to hold a topping without sinking.
-
When the base is chilled, melt the dark chocolate and milk chocolate together in a heatproof bowl over gently simmering water, or in short microwave bursts, stirring between each burst.
-
Stir in the vegetable oil until the chocolate looks smooth and slightly looser. Let it cool for a few minutes so it is pourable but not hot.
-
Pour the chocolate mixture over the chilled base and spread it evenly to the edges.
-
Return the dessert to the refrigerator and chill until the topping is fully set, about 1 to 2 hours.
-
Lift the dessert out using the parchment, cut into squares or bars, and serve chilled.
Pro Tips
- Let the base cool and firm up before adding the chocolate topping. On my first test, I added the topping too soon and it softened the surface a little.
- Use a saucepan with enough room to stir comfortably. The mixture thickens fast near the end, and a cramped pan makes it harder to mix evenly.
- If your cookies are very dry, the mixture may seem stiff at first, but it will come together once the butter goes in.
- Chill it longer than the minimum if you want neat slices. I found the cleanest cuts after the dessert had rested fully.
- Let the melted chocolate cool slightly before pouring it on. If it is too hot, it can melt into the base instead of sitting on top.
Common Mistakes to Avoid
- Boiling the mixture too aggressively. A gentle boil is enough; hard boiling can make the base grainy.
- Using cookies that are too soft or creamy. They can make the dessert overly dense and less structured.
- Skipping the chill before the topping. This was the first attempt mistake that made the topping uneven for me.
- Pouring hot chocolate directly onto the base. It can soften the chilled layer underneath.
- Cutting before the topping is fully set. The slices will look messy and lose their clean edges.
Variations
- Use hazelnuts instead of walnuts for a more festive, praline-like flavor.
- Add 1/2 teaspoon cinnamon or a pinch of ground cloves to the base for a warmer holiday taste.
- Replace the milk chocolate with extra dark chocolate if you prefer a less sweet dessert.
- Scatter a few chopped nuts or festive sprinkles over the topping before it sets for a decorative finish.
Serving Suggestions
Serve this dessert chilled, cut into small squares or narrow bars. It is rich, so smaller portions work best. I like it with coffee, black tea, or a glass of cold milk. For a holiday platter, pair it with fresh orange segments or berries to balance the chocolate.
Storage Instructions
Store the dessert in an airtight container in the refrigerator for up to 5 days. Separate layers with parchment paper if stacking. The texture holds best when kept cold, especially because of the chocolate topping.
Reheating Tips
This dessert is best served cold or slightly cool, so reheating is not necessary. If it has been in the fridge for a long time and feels too firm, let it sit at room temperature for 10 to 15 minutes before serving.
Nutrition Estimate
Per serving, based on 16 servings:
- Calories: 320
- Protein: 4 g
- Carbs: 36 g
- Fat: 18 g
Recipe Summary Card
- Prep Time: 20 minutes
- Cook Time: 10 minutes
- Total Time: 1 hour 30 minutes
- Servings: 16
- Cuisine: European-inspired
- Course: Dessert
- Calories: 320 per serving
Frequently Asked Questions
Can I make this dessert ahead of time?
Yes, and it actually benefits from being made ahead. I usually make it the day before serving so it has time to set fully.
What kind of cookies work best?
Plain tea biscuits, digestive cookies, or other dry, crisp cookies work best. Very soft cookies can make the texture too heavy.
Can I skip the walnuts?
Yes, but the dessert will be slightly less textured. If needed, you can replace them with hazelnuts or leave them out completely.
Why do you add oil to the chocolate topping?
The oil helps the chocolate stay smoother and slightly softer when sliced. It also gives the topping a nicer sheen.
How do I get clean slices?
Use a sharp knife and cut the dessert while it is well chilled. Wiping the knife between cuts helps a lot.
Conclusion
This is one of those simple holiday desserts that delivers more than you’d expect from the ingredient list. It’s easy, reliable, and festive without requiring much effort, which is exactly what I want in December. If you need a make-ahead chocolate dessert for Christmas, this one is a solid choice.
Tested Note
I tested this twice and found that the dessert cuts much cleaner after a full extra hour in the refrigerator. The flavor also tastes slightly better once the chocolate topping has had time to firm up completely.